上一篇简要说明了什么是substrate,在这一篇中将从实践角度近距离接触一下substrate,在本篇中我们将手动编译运行一个substrat私有节点,并且验证以下几个功能:
基于substrate node-template搭建一个私有节点
启动多个节点组成网络
自定义出块节点
自定义创世区块,创建chainspec.json文件
rust安装
substrate是用rust语言编程的,在搭建substrate私链的时候需要先编译substrate,所以需要安装rust相关编译环境。但是一般我们不单独下载rust的编译器,而是使用一个叫rustup的工具安装rust相关的一整套工具链,包括编译器、标准库、cargo等。使用这个工具,我们还可以轻易地更新版本、切换渠道、多工具链管理等。
rustup安装
1 curl https://getsubstrate.io -sSf | bash
为了让下载更顺畅,可以配置国内源。在~/.profile中添加如下两行:
1
2
export RUSTUP_DIST_SERVER=https://mirrors.sjtug.sjtu.edu.cn/rust-static export RUSTUP_UPDATE_ROOT=https://mirrors.sjtug.sjtu.edu.cn/rust-static/rustup
安装依赖
编译安装substrate需要一些预装依赖。substrate提供了快速安装和完全安装两种形式,都是傻瓜式一键安装
快速安装
快速安装仅安装依赖项,而不编译substrate。 1 curl https://getsubstrate.io -sSf | bash -s -- --fast
https://getsubstrate.io脚本中可以看出,脚本安装了以下三个依赖库:
OpenSSL
包含了一系列的软件包来实现安全通信,还是一个通用的加密库
CMake 是一个跨平台的编译打包工具
LLVM 是一个编译器框架,用来生成虚拟机字节码或者二进制机器码
完全安装
完全安装花费的时间很长,需要大概几分钟到十几分钟,具体时间取决于运行脚本的硬件,因为它还会编译substrate框架所需的所有rust库
1 curl https://getsubstrate.io -sSf | bash
完整安装除了包含上面的内容,还将安装以下两个工具:
subKey:用于创建substrate私钥的命令行工具substrate node:预配置的substrate节点,可以直接接入substrate测试网络
安装完成后执行命令检查安装是否正确:
1
2
3
4
source ~/.cargo/env substrate --version subkey --version
默认情况下,substrate和工具程序安装在~/.cargo/bin目录中,执行以下命令看一下安装的程序:
1
2
3
4
5
ls ~/.cargo/bin substrate-ui-new substrate-module-new polkadot-js-apps-new substrate-node-new substrae subkey
你会注意到除了substrate和subkey,还有substrate-node-new和substrate-module-new这两个程序,接下来我们将使用这些程序来创建新的私有节点。
由于完全安装的方式消耗时间很长,我们可以选择快速安装,需要的程序可以在使用到的时候在手动编译安装
安装node-template
substrate作为一个标准的区块链开发框架,不仅提供了必备的底层公共组件(如数据库、共识、P2P、交易池)和通用的runtime模块(如资产相关的balances,治理相关的democracy等),还提供了将各个功能组件连接起来的节点模板程序(node-template)。
从github上下载节点模板代码Substrate Node Template (version v2.0.0-rc4)
1 git clone -b v2.0.0-rc4 --depth 1 https://github.com/substrate-developer-hub/substrate-node-template
substrate采用最新稳定版rust进行编译。为保证rust编译器是最新的,运行如下命令:
1
2
# Update Rust rustup update nightly
substrate会使用到WebAssembly(Wasm),需要配置rust编译器使用nightly版本进行编译,命令如下:
1
2
3
rustup update stable # Add Wasm target rustup target add wasm32-unknown-unknown --toolchain nightly
接下来就可以进行编译了:
1
2
3
cd substrate-node-template/ git checkout -b my-first-substrate-chain cargo build --release
编译过程大概需要15到30分钟,具体视网络和机器性能而定。
编译过程中需要从cartes.io中下载一些依赖包,如果crates里面包下载过慢,可更改为国内源,修改~/.cargo/config文件,文件内容:
1
2
3
4
5
6
7
8
9
[source.crates-io] registry = "https://github.com/rust-lang/crates.io-index" replace-with = 'ustc' [source.ustc] registry = "git://mirrors.ustc.edu.cn/crates.io-index" [http] check-revoke=false
其中http下check-revoke=false的设置是为了解决有些包无法下载的问题。
单节点启动
编译完成后,接下来开始启动一个单节点,首先执行以下命令清除数据:
1
2
./target/release/node-template purge-chain --dev -y
然后通过以下命令运行节点,--dev表示启动一个本地开发链:
1
2
3
4
5
6
7
8
9
10
11
12
13
14
15
16
17
18
19
20
21
22
23
24
# Run your actual node in "development" mode ./target/release/node-template --dev 2020-07-20 08:17:59 Running in --dev mode, RPC CORS has been disabled. 2020-07-20 08:17:59 Substrate Node 2020-07-20 08:17:59 ✌️ version 2.0.0-rc4-ff0fa24-x86_64-macos 2020-07-20 08:17:59 ❤️ by Substrate DevHub <https://github.com/substrate-developer-hub>, 2017-2020 2020-07-20 08:17:59 📋 Chain specification: Development 2020-07-20 08:17:59 🏷 Node name: absorbing-rub-5487 2020-07-20 08:17:59 👤 Role: AUTHORITY 2020-07-20 08:17:59 💾 Database: RocksDb at /Users/shouhewu/Library/Application Support/node-template/chains/dev/db 2020-07-20 08:17:59 ⛓ Native runtime: node-template-1 (node-template-1.tx1.au1) 2020-07-20 08:18:00 🔨 Initializing Genesis block/state (state: 0x4873…6b70, header-hash: 0x6507…6b1c) 2020-07-20 08:18:00 👴 Loading GRANDPA authority set from genesis on what appears to be first startup. 2020-07-20 08:18:00 ⏱ Loaded block-time = 6000 milliseconds from genesis on first-launch 2020-07-20 08:18:00 📦 Highest known block at #0 2020-07-20 08:18:00 Using default protocol ID "sup" because none is configured in the chain specs 2020-07-20 08:18:00 🏷 Local node identity is: 12D3KooWNQcY6Nok89pZA8beSJYxud9tXmaa4njmg5tYVHfqu6Fu (legacy representation: QmQvaKQMAasAAXa1ePzanvVWyjMx2dvB3Pa9UDZM2swvr7) 2020-07-20 08:18:00 〽️ Prometheus server started at 127.0.0.1:9615 2020-07-20 08:18:05 💤 Idle (0 peers), best: #0 (0x6507…6b1c), finalized #0 (0x6507…6b1c), ⬇ 0 ⬆ 0 2020-07-20 08:18:06 🙌 Starting consensus session on top of parent 0x6507cc935d4965698302c6c4a30a19a2bbe4b4fe4657734d08d122139bde6b1c 2020-07-20 08:18:06 🎁 Prepared block for proposing at 1 [hash: 0x4b17dcfa7844be12bf6510e71f5e223c14d0d049ed6043adf67dfcc64f5a6fca; parent_hash: 0x6507…6b1c; extrinsics (1): [0x6f75…2375]] 2020-07-20 08:18:06 🔖 Pre-sealed block for proposal at 1. Hash now 0xb486e13b481222879df3f1de669c8ffc92bb0ef5d50fdf68924b4ca4ed8630f0, previously 0x4b17dcfa7844be12bf6510e71f5e223c14d0d049ed6043adf67dfcc64f5a6fca. 2020-07-20 08:18:06 ✨ Imported #1 (0xb486…30f0)
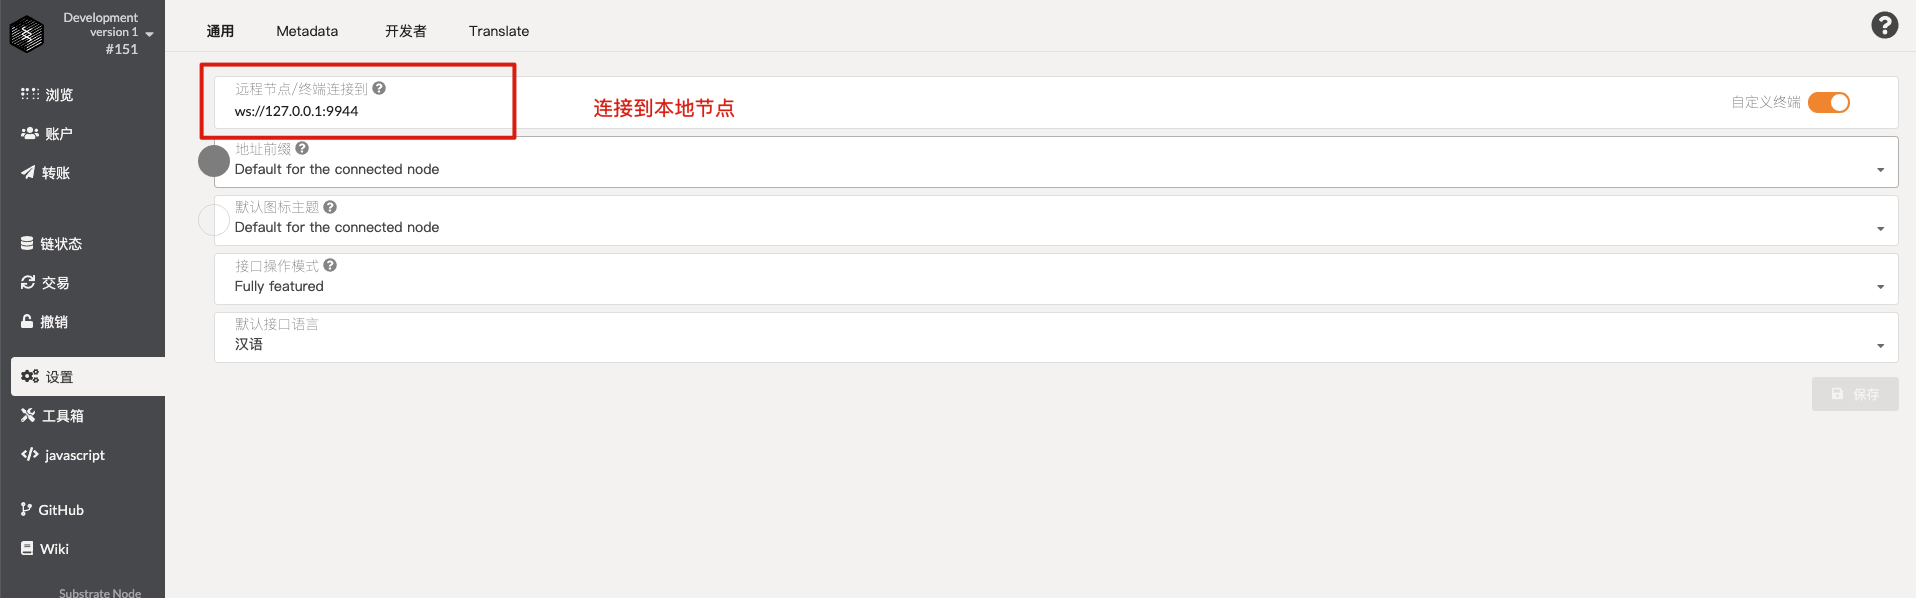
看到高度一直在增加,说明链已经在生产新的区块了,启动成功。从浏览器中打开https://polkadot.js.org/apps/#/settings?rpc=ws://127.0.0.1:9944 链接,其中rpc=ws://127.0.0.1:9944表示通过websocket方式连接你本地节点
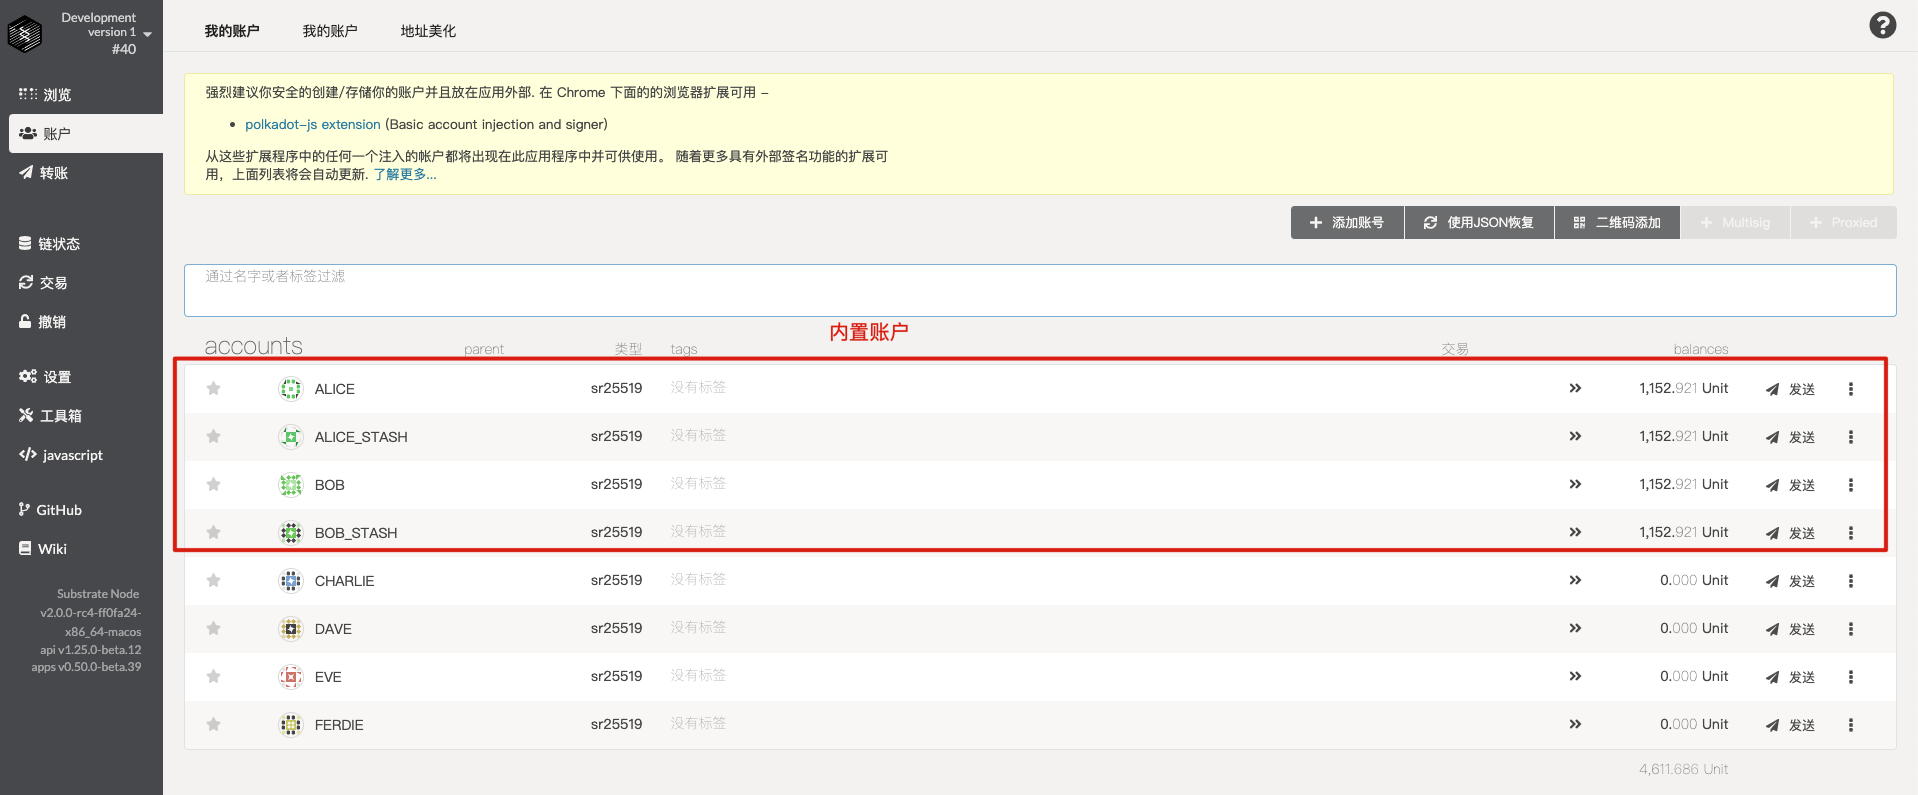
打开Accounts选项卡,你会看到已经有几个内置账号,并且账号有Token:
点击"添加账号"按钮创建一个自己的账号:
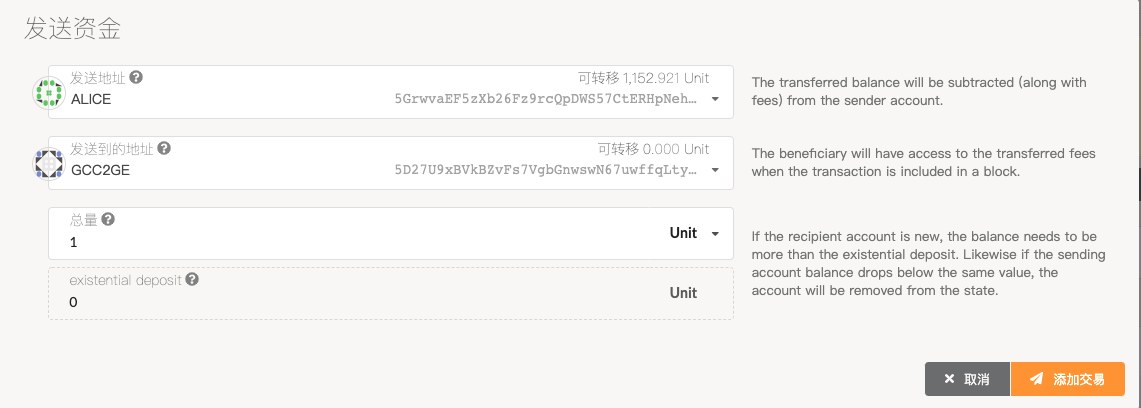
创建完成后点击右边导航"交易"菜单向你的账号转账,转账从Alice转给gcc2ge
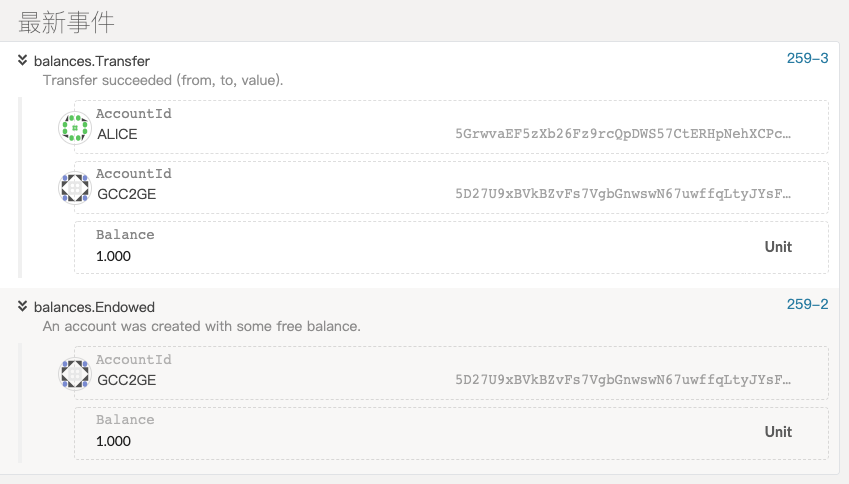
转账成功后会收到转账成功的通知
至此你的第一个Substrate链就算创建完成了。
多节点启动
接下来演示使用两个内置的账户Alice与Bob作为出块节点组成区块链网络。
在启动Alice节点之前先清空数据:
1 ./target/release/node-template purge-chain --base-path /tmp/alice --chain local -y
启动Alice节点:
1
2
3
4
5
6
7
8
9
10
11
# Start Alice's node ./target/release/node-template \ --base-path /tmp/alice \ --chain local \ --alice \ --port 30333 \ --ws-port 9944 \ --rpc-port 9933 \ --telemetry-url 'ws://telemetry.polkadot.io:1024 0' \ --validator
命令行参数的解释如下:
--base-path /tmp/alice:节点数据存储的位置--chain=local:指定了节点所处的网络类型,这里local表示本地测试网络,dev表示本地开发,staging表示公开测试网络--alice:模块节点程序启动时需要私钥,这里我们用了预置的Alice用户私钥--port 30333:指定p2p协议的TCP端口--ws-port 9944:指定websocket接听端口--rpc-port 9933:指定rpc监听端口--telemetry-url 'ws://telemetry.polkadot.io:1024 0':将节点的监控数据发送到指定的监控服务器--validator:启用validator模式,参与区块生产
启动完成后,输出如下:
1
2
3
4
5
6
7
8
9
10
11
12
13
14
15
16
17
18
19
2020-07-20 11:39:46 Substrate Node 2020-07-20 11:39:46 ✌️ version 2.0.0-rc4-ff0fa24-x86_64-macos 2020-07-20 11:39:46 ❤️ by Substrate DevHub <https://github.com/substrate-developer-hub>, 2017-2020 2020-07-20 11:39:46 📋 Chain specification: Local Testnet 2020-07-20 11:39:46 🏷 Node name: Alice 2020-07-20 11:39:46 👤 Role: AUTHORITY 2020-07-20 11:39:46 💾 Database: RocksDb at /tmp/alice/chains/local_testnet/db 2020-07-20 11:39:46 ⛓ Native runtime: node-template-1 (node-template-1.tx1.au1) 2020-07-20 11:39:46 🔨 Initializing Genesis block/state (state: 0x4a9b…7ece, header-hash: 0x2d08…1087) 2020-07-20 11:39:46 👴 Loading GRANDPA authority set from genesis on what appears to be first startup. 2020-07-20 11:39:46 ⏱ Loaded block-time = 6000 milliseconds from genesis on first-launch 2020-07-20 11:39:46 📦 Highest known block at #0 2020-07-20 11:39:46 Using default protocol ID "sup" because none is configured in the chain specs 2020-07-20 11:39:46 🏷 Local node identity is: 12D3KooWSXvKQoxGzG7vwpuLNTP4uf7Z2aLroqEf2VJGZA5dXc8W (legacy representation: QmXkF8Q7g4gGSAgSRhqGrPKiNpcjeRAD8wcS7hUH5umjEe) 2020-07-20 11:39:46 〽️ Prometheus server started at 127.0.0.1:9615 2020-07-20 11:49:23 💤 Idle (0 peers), best: #0 (0x2d08…1087), finalized #0 (0x2d08…1087), ⬇ 0 ⬆ 0 2020-07-20 11:49:28 💤 Idle (0 peers), best: #0 (0x2d08…1087), finalized #0 (0x2d08…1087), ⬇ 0 ⬆ 0 2020-07-20 11:49:33 💤 Idle (0 peers), best: #0 (0x2d08…1087), finalized #0 (0x2d08…1087), ⬇ 0 ⬆ 0 2020-07-20 11:49:38 💤 Idle (0 peers), best: #0 (0x2d08…1087), finalized #0 (0x2d08…1087), ⬇ 0 ⬆ 0
2020-07-20 11:39:46 🔨 Initializing Genesis block/state (state: 0x4a9b…7ece, header-hash: 0x2d08…1087),表示当前节点正在使用的创世块信息,当启动另一个节点的时候可以验证两个节点使用的创世块是否一致。
2020-07-20 11:39:46 🏷 Local node identity is: 12D3KooWSXvKQoxGzG7vwpuLNTP4uf7Z2aLroqEf2VJGZA5dXc8W (legacy representation: QmXkF8Q7g4gGSAgSRhqGrPKiNpcjeRAD8wcS7hUH5umjEe)表示当前节点Alice的peer id信息,当另一个节点需要加入网络的时候需要得到Alice的peer id
2020-07-20 11:49:38 💤 Idle (0 peers), best: #0 (0x2d08…1087), finalized #0 (0x2d08…1087), ⬇ 0 ⬆ 0,当前节点处于空闲状态,并没有产生区块,需要另一个节点加入到网络中时候才开始产生区块
打开一个新的命令行窗口,启动Bob节点,同样在启动之前先清空数据:
1 ./target/release/node-template purge-chain --base-path /tmp/bob --chain local -y
启动Bob节点:
1
2
3
4
5
6
7
8
9
10
./target/release/node-template \ --base-path /tmp/bob \ --chain local \ --bob \ --port 30334 \ --ws-port 9945 \ --rpc-port 9934 \ --telemetry-url 'ws://telemetry.polkadot.io:1024 0' \ --validator \ --bootnodes /ip4/<Alices IP Address>/tcp/<Alices Port>/p2p/<Alices Peer ID>
Bob的启动参数中大多数与Alice是相同的,下面对一些不同点做解释:
-
由于Alice与Bob运行在同一台机器上,所以为Bob节点指定了不同的数据存储路径、p2p端口等。
-
--bootnodes指明了依赖的启动节点信息,这里使用了Alice节点作为启动节点
-
<Alices IP Address>:Alice的IP地址,127.0.0.1
-
<Alices Port>:Alice的端口30333
-
<Alices Peer ID>:Alice的节点ID为12D3KooWSXvKQoxGzG7vwpuLNTP4uf7Z2aLroqEf2VJGZA5dXc8W
Bob完整的启动命令如下:
1
2
3
4
5
6
7
8
9
10
./target/release/node-template \ --base-path /tmp/bob \ --chain local \ --bob \ --port 30334 \ --ws-port 9945 \ --rpc-port 9934 \ --telemetry-url 'ws://telemetry.polkadot.io:1024 0' \ --validator \ --bootnodes /ip4/127.0.0.1/tcp/30333/p2p/12D3KooWSXvKQoxGzG7vwpuLNTP4uf7Z2aLroqEf2VJGZA5dXc8W
如果一切正常,你应该能够看到:
1
2
3
4
5
6
7
8
9
10
11
12
13
14
15
16
17
18
19
20
21
22
2020-07-20 12:03:06 Substrate Node 2020-07-20 12:03:06 ✌️ version 2.0.0-rc4-ff0fa24-x86_64-macos 2020-07-20 12:03:06 ❤️ by Substrate DevHub <https://github.com/substrate-developer-hub>, 2017-2020 2020-07-20 12:03:06 📋 Chain specification: Local Testnet 2020-07-20 12:03:06 🏷 Node name: Bob 2020-07-20 12:03:06 👤 Role: AUTHORITY 2020-07-20 12:03:06 💾 Database: RocksDb at /tmp/bob/chains/local_testnet/db 2020-07-20 12:03:06 ⛓ Native runtime: node-template-1 (node-template-1.tx1.au1) 2020-07-20 12:03:06 🔨 Initializing Genesis block/state (state: 0x4a9b…7ece, header-hash: 0x2d08…1087) 2020-07-20 12:03:06 👴 Loading GRANDPA authority set from genesis on what appears to be first startup. 2020-07-20 12:03:06 ⏱ Loaded block-time = 6000 milliseconds from genesis on first-launch 2020-07-20 12:03:06 📦 Highest known block at #0 2020-07-20 12:03:06 Using default protocol ID "sup" because none is configured in the chain specs 2020-07-20 12:03:06 🏷 Local node identity is: 12D3KooWFXtZhw1D1Abx7kEPwcMKopKg47VgbvLCv6PaRr8zd98d (legacy representation: Qmd7DXScrYP1MPRnbBNneXYp7jFXhQ9yy8Vvk4jwViLD68) 2020-07-20 12:03:08 🔍 Discovered new external address for our node: /ip4/127.0.0.1/tcp/30334/p2p/12D3KooWFXtZhw1D1Abx7kEPwcMKopKg47VgbvLCv6PaRr8zd98d 2020-07-20 12:03:11 💤 Idle (1 peers), best: #0 (0x2d08…1087), finalized #0 (0x2d08…1087), ⬇ 1.3kiB/s ⬆ 1.3kiB/s 2020-07-20 12:03:12 ✨ Imported #1 (0x5304…fd86) 2020-07-20 12:03:16 💤 Idle (1 peers), best: #1 (0x5304…fd86), finalized #0 (0x2d08…1087), ⬇ 0.8kiB/s ⬆ 0.7kiB/s 2020-07-20 12:03:18 🙌 Starting consensus session on top of parent 0x53047ad945f475b5aa452d334bd3fbc98363beda42ca41239af9ab91d306fd86 2020-07-20 12:03:18 🎁 Prepared block for proposing at 2 [hash: 0xb29bb6177c20409ea3fc0f2d8a9e6984147188096e1c2839c060a596b367d0e5; parent_hash: 0x5304…fd86; extrinsics (1): [0xc60e…6c01]] 2020-07-20 12:03:18 🔖 Pre-sealed block for proposal at 2. Hash now 0x139699ad88d0c4035fc1c8ae91131d9f1d5260c3675f63895a6f4b47f2b7d623, previously 0xb29bb6177c20409ea3fc0f2d8a9e6984147188096e1c2839c060a596b367d0e5. 2020-07-20 12:03:18 ✨ Imported #2 (0x1396…d623)
2020-07-20 12:03:08 🔍 Discovered new external address for our node: /ip4/127.0.0.1/tcp/30334/p2p/12D3KooWFXtZhw1D1Abx7kEPwcMKopKg47VgbvLCv6PaRr8zd98d表示Bob已经连接上了Alice的节点
2020-07-20 12:03:11 💤 Idle (1 peers), best: #0 (0x2d08…1087), finalized #0 (0x2d08…1087), ⬇ 1.3kiB/s ⬆ 1.3kiB/s表示Bob已经同步了Alice的创世块,可以与上面Alice的创世块信息做对比看是否两个创世块的信息是否一致。
同样可以在浏览器中打开https://polkadot.js.org/apps/#/settings?rpc=ws://127.0.0.1:9944 链接,查看区块状态。
私钥生成
目前我们使用的是内置的账户作为区块生产者,现在我们将生成自己的账户,并且将账户作为区块生产者加入到区块链网络中。
方法一:subkey
subkey是一个生成私钥的工具,首先需要编译生成subkey,这个过程需要大概15分钟。
1 cargo install --force subkey --git https://github.com/paritytech/substrate --tag v2.0.0-rc4
接下来将生成两种类型地址,分别用于区块生产,区块最终确认。
sr25519
sr25519用于Aura共识算法区块生成,执行下面命令将生产一个助记符,并且生成sr25519相关的公钥以及地址
1
2
3
4
5
6
7
8
$ subkey --sr25519 generate Secret phrase `infant salmon buzz patrol maple subject turtle cute legend song vital leisure` is account: Network ID/version: substrate Secret seed: 0xa2b0200f9666b743402289ca4f7e79c9a4a52ce129365578521b0b75396bd242 Public key (hex): 0x0a11c9bcc81f8bd314e80bc51cbfacf30eaeb57e863196a79cccdc8bf4750d21 Account ID: 0x0a11c9bcc81f8bd314e80bc51cbfacf30eaeb57e863196a79cccdc8bf4750d21 SS58 Address: 5CHucvTwrPg8L2tjneVoemApqXcUaEdUDsCEPyE7aDwrtR8D
ed25519用于GRANDPA算法做区块最终确认,使用上面的助记符生成ed25519相关的公钥以及地址。
sr25519与ed25519使用的都是同一条椭圆曲线curve25519。
1
2
3
4
5
6
7
8
$ subkey --ed25519 inspect "infant salmon buzz patrol maple subject turtle cute legend song vital leisure" Secret phrase `infant salmon buzz patrol maple subject turtle cute legend song vital leisure` is account: Network ID/version: substrate Secret seed: 0xa2b0200f9666b743402289ca4f7e79c9a4a52ce129365578521b0b75396bd242 Public key (hex): 0x1a0e2bf1e0195a1f5396c5fd209a620a48fe90f6f336d89c89405a0183a857a3 Account ID: 0x1a0e2bf1e0195a1f5396c5fd209a620a48fe90f6f336d89c89405a0183a857a3 SS58 Address: 5CesK3uTmn4NGfD3oyGBd1jrp4EfRyYdtqL3ERe9SXv8jUHb
方法二:Polkadot-JS 页面
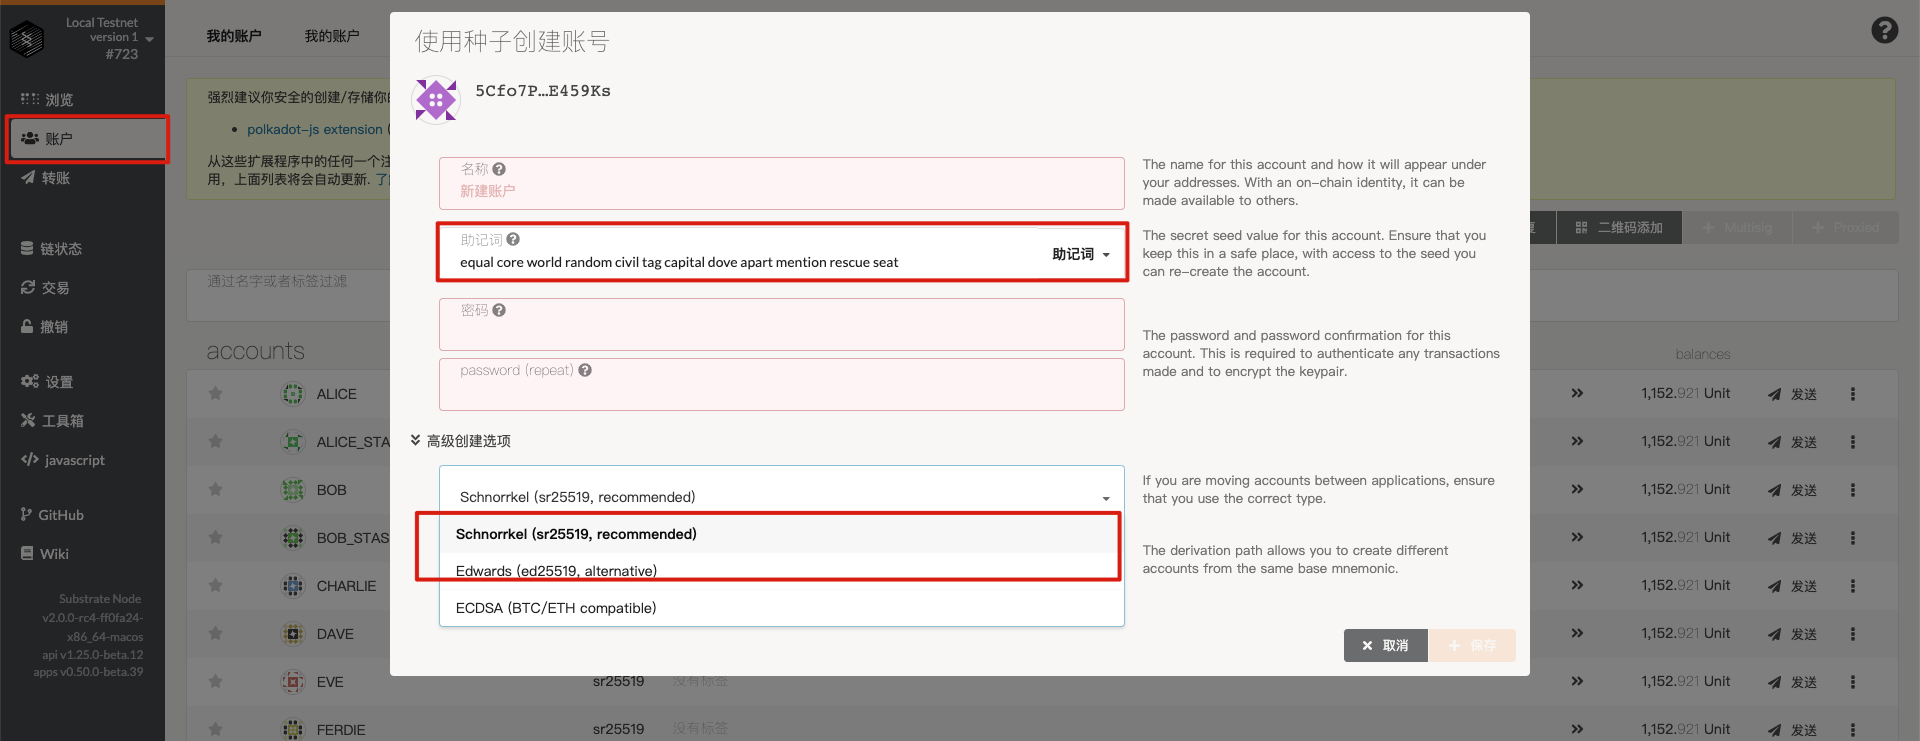
由于subkey编译生成时间较长,为了快速生成相关私钥可以在浏览器中打开https://polkadot.js.org/apps/#/settings?rpc=ws://127.0.0.1:9944 链接。点击左侧账户,生成相关私钥。
方法三:预生成地址
如果以上两种方法生成地址失败,可以暂时使用下面预生成的地址,用于继续学习下面的内容
地址一
Secret phrase
clip organ olive upper oak void inject side suit toilet stick narrow
Secret seed
0x4bd2b2c1dad3dbe3fa37dc6ad5a4e32ddd8ad84b938179ac905b0622880e86e7
SR25519
Public key
0x9effc1668ca381c242885516ec9fa2b19c67b6684c02a8a3237b6862e5c8cd7e
SS58 Address
5FfBQ3kwXrbdyoqLPvcXRp7ikWydXawpNs2Ceu3WwFdhZ8W4
ED25519
Public key
0xb48004c6e1625282313b07d1c9950935e86894a2e4f21fb1ffee9854d180c781
SS58 Address
5G9NWJ5P9uk7am24yCKeLZJqXWW6hjuMyRJDmw4ofqxG8Js2
地址二
Secret phrase
paper next author index wedding frost voice mention fetch waste march tilt
Secret seed
0x4846fedafeed0cf307da3e2b5dfa61415009b239119242006fc8c0972dde64b0
SR25519
Public key
0x74cca68a32156615a5923c67024db70da5e7ed36e70c8cd5bcf3556df152bb6d
SS58 Address
5EhrCtDaQRYjVbLi7BafbGpFqcMhjZJdu8eW8gy6VRXh6HDp
ED25519
Public key
0x0fe9065f6450c5501df3efa6b13958949cb4b81a2147d68c14ad25366be1ccb4
SS58 Address
5CRZoFgJs4zLzCCAGoCUUs2MRmuD5BKAh17pWtb62LMoCi9h
自定义创世块
之前启动节点的时候用到了--chain local,这是一个预定义的chain spec,在这个创世块文件中将Alice与Bob作为验证着,现在我们可以基于这个创世块模板做修改,创建我们自己的创世块文件,首先将local内置的创世块文件导出:
1
2
3
# Export the local chainspec to json $ ./target/release/node-template build-spec --disable-default-bootnode --chain local > customSpec.json
执行cat customSpec.json命令,打开customSpec.json文件:
1
2
3
4
5
6
7
8
9
10
11
12
13
14
15
16
17
18
19
20
21
22
23
24
25
26
27
28
29
30
31
32
33
34
35
36
37
38
39
40
41
42
43
44
45
46
47
48
49
50
51
52
53
54
55
56
57
58
59
60
61
62
63
64
65
66
67
68
69
70
71
72
73
74
75
76
77
78
79
80
81
82
83
84
85
86
87
88
89
90
91
{ "name": "Local Testnet", "id": "local_testnet", "chainType": "Local", "bootNodes": [], "telemetryEndpoints": null, "protocolId": null, "properties": null, "consensusEngine": null, "genesis": { "runtime": { // runtime 模块 "system": { // system runtime "changesTrieConfig": null, "code": "0x0061736d0100000001ee012460037f7f7f017f60027f7f017f60........" }, "aura": { // 生成区块账户 配置 "authorities": [ "5GrwvaEF5zXb26Fz9rcQpDWS57CtERHpNehXCPcNoHGKutQY", // Alice "5FHneW46xGXgs5mUiveU4sbTyGBzmstUspZC92UhjJM694ty" // Bob ] }, "grandpa": { // 区块确认账户配置 "authorities": [ [ "5FA9nQDVg267DEd8m1ZypXLBnvN7SFxYwV7ndqSYGiN9TTpu", // Alice 1 ], [ "5GoNkf6WdbxCFnPdAnYYQyCjAKPJgLNxXwPjwTh6DGg6gN3E", // Bob 1 ] ] }, "balances": { // 余额,在创世区块中为账户分配余额 "balances": [ [ "5GrwvaEF5zXb26Fz9rcQpDWS57CtERHpNehXCPcNoHGKutQY", 1152921504606846976 ], [ "5FHneW46xGXgs5mUiveU4sbTyGBzmstUspZC92UhjJM694ty", 1152921504606846976 ], [ "5FLSigC9HGRKVhB9FiEo4Y3koPsNmBmLJbpXg2mp1hXcS59Y", 1152921504606846976 ], [ "5DAAnrj7VHTznn2AWBemMuyBwZWs6FNFjdyVXUeYum3PTXFy", 1152921504606846976 ], [ "5HGjWAeFDfFCWPsjFQdVV2Msvz2XtMktvgocEZcCj68kUMaw", 1152921504606846976 ], [ "5CiPPseXPECbkjWCa6MnjNokrgYjMqmKndv2rSnekmSK2DjL", 1152921504606846976 ], [ "5GNJqTPyNqANBkUVMN1LPPrxXnFouWXoe2wNSmmEoLctxiZY", 1152921504606846976 ], [ "5HpG9w8EBLe5XCrbczpwq5TSXvedjrBGCwqxK1iQ7qUsSWFc", 1152921504606846976 ], [ "5Ck5SLSHYac6WFt5UZRSsdJjwmpSZq85fd5TRNAdZQVzEAPT", 1152921504606846976 ], [ "5HKPmK9GYtE1PSLsS1qiYU9xQ9Si1NcEhdeCq9sw5bqu4ns8", 1152921504606846976 ], [ "5FCfAonRZgTFrTd9HREEyeJjDpT397KMzizE6T3DvebLFE7n", 1152921504606846976 ], [ "5CRmqmsiNFExV6VbdmPJViVxrWmkaXXvBrSX8oqBT8R9vmWk", 1152921504606846976 ] ] }, "sudo": { "key": "5GrwvaEF5zXb26Fz9rcQpDWS57CtERHpNehXCPcNoHGKutQY" } } } }
接下来我们将customSpec.json文件中的aura与grandpa字段里面的地址改成我们的,修改完成后将customSpec.json做格式转化:
1
2
$ ./target/release/node-template build-spec --chain=customSpec.json --raw --disable-default-bootnode > customSpecRaw.json
接下来向其他节点分发customSpecRaw.json文件,其他节点启动的时候需要指定customSpecRaw.json作为创世文件。
1
2
3
4
5
6
7
8
9
10
./target/release/node-template \ --base-path /tmp/node01 \ --chain=./customSpecRaw.json \ --port 30333 \ --ws-port 9944 \ --rpc-port 9933 \ --telemetry-url 'ws://telemetry.polkadot.io:1024 0' \ --validator \ --rpc-methods=Unsafe \ --name MyNode01
--chain指定customSpecRaw.json作为创世文件
启动成功后,输出如下:
1
2
3
4
5
6
7
8
9
10
11
12
13
14
15
16
2020-07-20 14:13:20 Substrate Node 2020-07-20 14:13:20 ✌️ version 2.0.0-rc4-ff0fa24-x86_64-macos 2020-07-20 14:13:20 ❤️ by Substrate DevHub <https://github.com/substrate-developer-hub>, 2017-2020 2020-07-20 14:13:20 📋 Chain specification: Local Testnet 2020-07-20 14:13:20 🏷 Node name: MyNode01 2020-07-20 14:13:20 👤 Role: AUTHORITY 2020-07-20 14:13:20 💾 Database: RocksDb at /tmp/node01/chains/local_testnet/db 2020-07-20 14:13:20 ⛓ Native runtime: node-template-1 (node-template-1.tx1.au1) 2020-07-20 14:13:20 🔨 Initializing Genesis block/state (state: 0xff74…91ae, header-hash: 0x7d07…c3ac) 2020-07-20 14:13:20 👴 Loading GRANDPA authority set from genesis on what appears to be first startup. 2020-07-20 14:13:20 ⏱ Loaded block-time = 6000 milliseconds from genesis on first-launch 2020-07-20 14:13:20 📦 Highest known block at #0 2020-07-20 14:13:20 Using default protocol ID "sup" because none is configured in the chain specs 2020-07-20 14:13:20 🏷 Local node identity is: 12D3KooWLbibaghJ1TfUQcjetp4yggpFNdMhi7mn7vwgDcPEdZtk (legacy representation: QmQRB1sVkwkWM7ng4icMyhZpq96N26uw33RibMaVVMgMQn) 2020-07-20 14:13:21 〽️ Prometheus server started at 127.0.0.1:9615 2020-07-20 14:13:26 💤 Idle (0 peers), best: #0 (0x7d07…c3ac), finalized #0 (0x7d07…c3ac), ⬇ 0 ⬆ 0
Keystore
由于substrate共识算法的特性,在生成区块的时候aura需要节点的私钥来签名区块,在对区块做最终确认的时候GRANDPA也需要节点的私钥对区块进行签名,所以我们需要将两个私钥分别上传到keystore目录中。
方法一:Polkadot-JS Apps UI
同样在浏览器中打开https://polkadot.js.org/apps/#/settings?rpc=ws://127.0.0.1:9944 链接,点击左侧“工具箱”,在右侧页面中分别选择auther与insertkey,在表格中分别填写相关信息,首先填写sr25519
接下来用同样的方法填写ed25519
填写完成后,在Keystore目录中可以看到上传的私钥信息
1
2
3
ls /tmp/node01/chains/local_testnet/keystore 617572619effc1668ca381c242885516ec9fa2b19c67b6684c02a8a3237b6862e5c8cd7e 6772616eb48004c6e1625282313b07d1c9950935e86894a2e4f21fb1ffee9854d180c781
方法二:CURL
通过curl方式提交私钥到keystore
1
2
3
4
5
6
7
8
9
10
11
# Submit a new key via RPC, connect to where your `rpc-port` is listening $ curl http://localhost:9933 -H "Content-Type:application/json;charset=utf-8" -d '{ "jsonrpc":"2.0", "id":1, "method":"author_insertKey", "params": [ "<aura/gran>", "<mnemonic phrase>", "<public key>" ] }'
接下来通过同样的方式启动第二个节点:
1
2
3
4
5
6
7
8
9
10
11
./target/release/node-template \ --base-path /tmp/node02 \ --chain ./customSpecRaw.json \ --port 30334 \ --ws-port 9945 \ --rpc-port 9934 \ --telemetry-url 'ws://telemetry.polkadot.io:1024 0' \ --validator \ --rpc-methods=Unsafe \ --name MyNode02 \ --bootnodes /ip4/<IP Address>/tcp/<Port>/p2p/<Peer ID>
到这一步我们已经完成了自定义私有区块链网络。